Flannel 是 coreos 公司针对 docker 和 kubernetes 设计的一个网络工具。本篇主要介绍 docker 环境下如何使用 flannel。 以下都基于 v0.9.0 版本的 flannel。
编译
flannel 没有提供二进制包,所以需要自己编译。有两个选择:
- 在docker 容器内编译:
make dist/flanneld-amd64。编译完成后 dist/ 目录下,会生成 flanneld-amd64。 - 手动编译:
cd flannel; CGO_ENABLED=1 make dist/flanneld。同样在 dist/ 目录下,会生成 flanneld。
架构规划
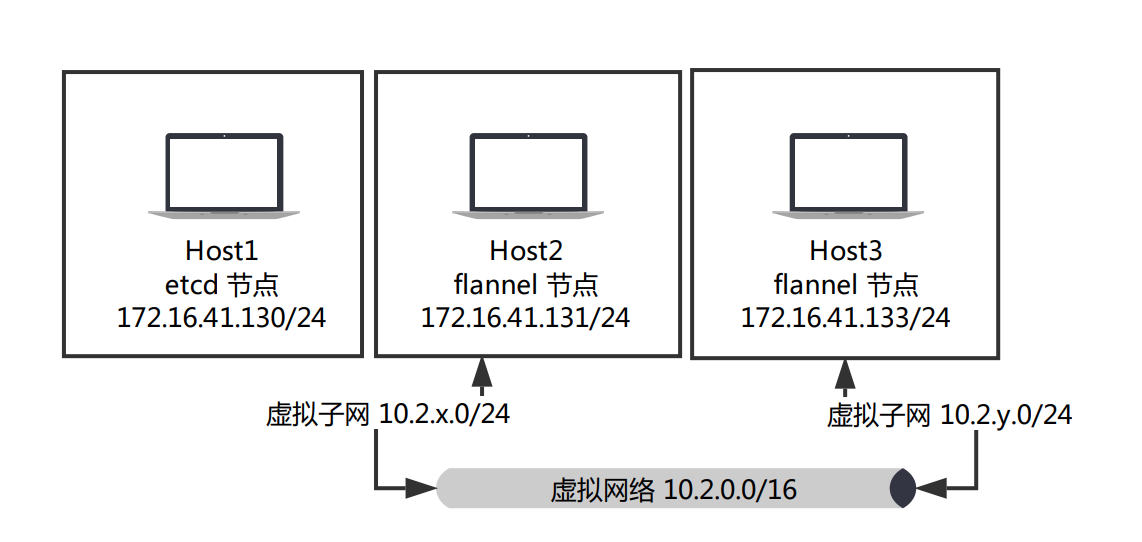
我们会在 host1 上运行 etcd。Host2 和 host3 则运行 flanneld,这两台主机之间会创建一个虚拟网络 10.2.0.0/16,host2 上会分配到 10.2.x.0/24 的子网,host3 则分配到 10.2.y.0/24 的子网。
运行
etcd
首先在 host1 上启动 v2 的 etcd:
etcd --listen-client-urls http://0.0.0.0:2379 --advertise-client-urls http://0.0.0.0:2379
然后向 etcd 写入配置,键地址必须为 {prefix}/config:
etcdctl set /docker/network/config < flannel.json
flannel.json 内容如下:
{
  "Network": "10.2.0.0/16",
  "SubnetLen": 24,
  "Backend": {
     "Type": "vxlan"
  }
}
flanneld
在 host2 上启动 flanneld:
./flanneld -etcd-endpoints=http://172.16.41.130:2379 -iface=ens33 \
  -etcd-prefix=/docker/network
-etcd-prefix 就是上面通过 etcd 配置虚拟网络时,用到的键前缀。
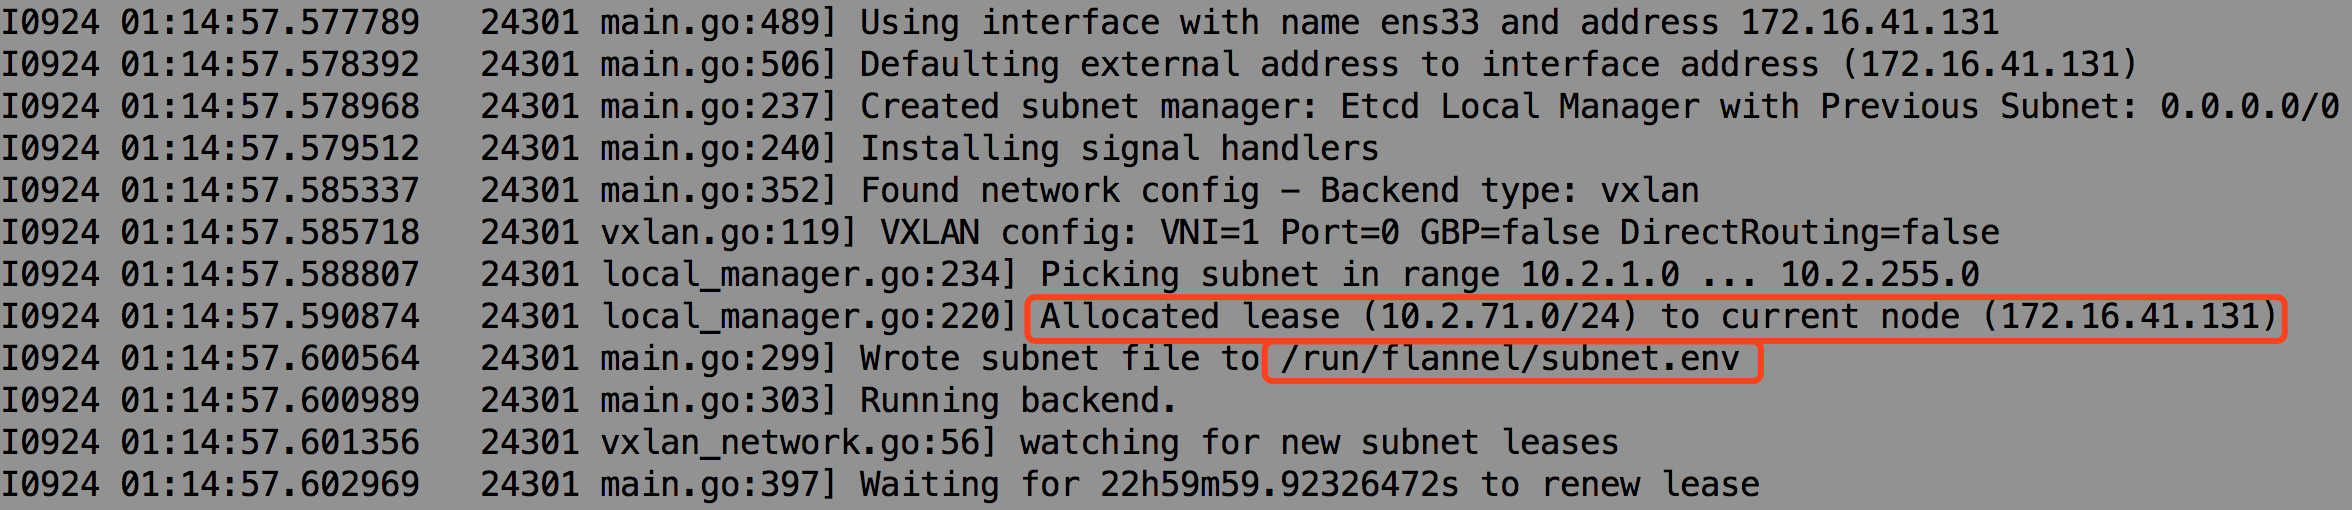
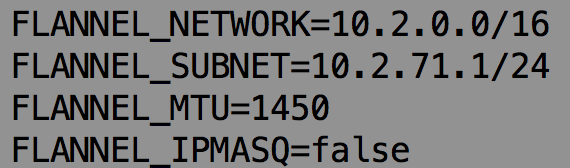
分配了 10.2.71.0/24 这个子网给 host2,同时将子网信息保存到 /run/flannel/subnet.env,如下:
这时通过 ip link,可以发现多了个设备 flannel.1。

ip addr show flannel.1,可以看到其 ip 地址信息,为该子网的第一个地址。

docker
配置 host2 的 docker,修改 /lib/systemd/system/docker.service,在 docker 启动参数上加上:
--bip= ${FLANNEL_SUBNET} --mtu=${FLANNEL_MTU},如下图:
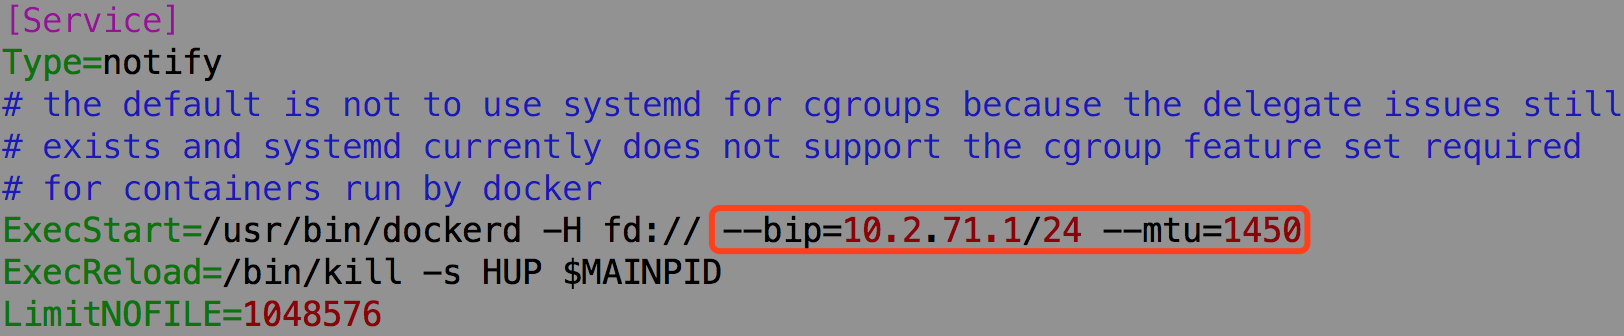
重启 docker,systemctl daemon-reload,systemctl restart docker.service。
可以发现 docker0 网桥的地址变为 10.2.71.1/24。

Host3 同样配置一下 flanneld 和 docker,其 subnet 为 10.2.41.0/24。
最后在 host2 上,通过 ip route 观察其路由:

红框第一条表示,所有目的地址为 10.2.41.0/24 的数据包,都通过 flannel.1 接口发出,下一跳的地址为 10.2.41.0。简单来说,就是本机通往 host3 subnet 的数据包都要经过本机的 flannel.1 接口,然后到达 host3 的 flannel.1 。
第二条为,目的地址为 10.2.71.0/24 的数据包,都要经过 docker0 接口,并且将包的源地址设置为 10.2.71.1。即发往本机 subnet 的数据包,是要经过 docker0,然后转换源地址为 docker0 的地址。
验证
在 host2 和 host3 分别运行一个容器,任意一个容器都能 ping 通另一个容器的 ip 地址。
docker 新版本问题
从 docker 1.13 起,docker 主动关闭了 iptables 的 FORWARD 链,导致虚拟网络不通,不能转发数据包。
可以通过 iptables -P FORWARD ACCEPT 解决。